How to Tie Dye Socks
Learn how to easily tie dye socks in interesting patterns and bright colors with this DIY guide.
Yield: 1 pair
Equipment
- Pair of Scissors to cut the rubber bands after rinsing
- Plastic Tablecloths, Large Trash Bags, or Tarps to protect work surfaces
- Roasting Pan or Plastic Bin (optional)
- Wire Cooling Rack (optional)
Materials
- Mostly Cotton Socks white
- Tie Dye Kit preferably Tulip One-Step Tie Dye
- Squeeze Bottles if not included in your tie dye kit
- Water
- Protective Gloves
- Rubber Bands
- Plastic Bag or Plastic Wrap
- Laundry Detergent
- Paper Towels optional
Instructions
- Dampen your pre-washed socks.
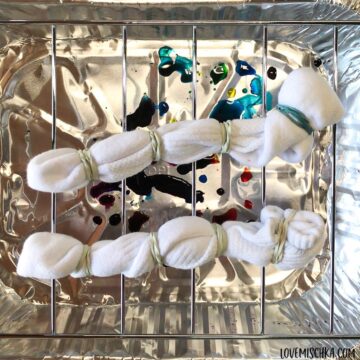
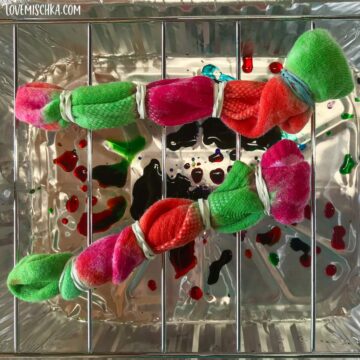
- Fold, scrunch, or twist your sock or socks. You can do each sock separately or together as a pair.
- Wrap rubber bands around your folded, scrunched, or twisted sock or socks to secure the design. The placement of elastic bands also help to create different patterns. They help to resist the dye, keeping it from saturating the fabric evenly.
- If doing each sock of a pair separately, repeat step 3 with the other sock in the pair.
- Put protective gloves on. If you haven’t already, follow the package instructions of your kit to mix the dye. I recommend mixing the dye with gloves on in case it leaks.
- Place socks on your protected work surface.
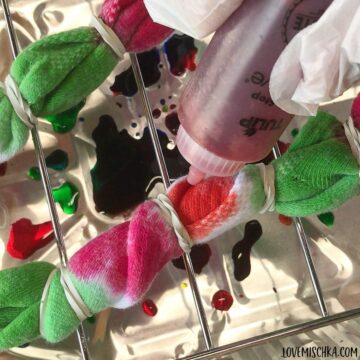
- Carefully remove the cap from your desired color's squirt bottle (it can splatter) and squeeze dye onto the sock. Do one color at a time.
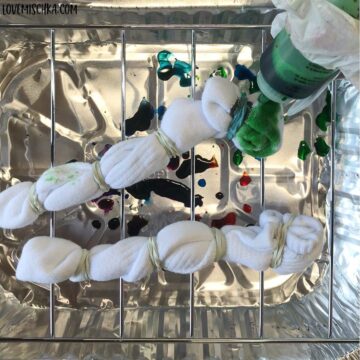
- Use the tip of the bottle to get dye into folds. If you want more white areas, put it in less folds.
- Turn the sock or socks over and place dye in the same areas as the other side.
- If you want to add more colors, repeat steps 7-9 with each color. Do a single color at a time.
- Place the tie-dyed socks in a plastic bag. If they are separate, it is best to wrap each sock in its own plastic wrap to prevent the socks from hitting and transferring color. I learned this the hard way when I placed both socks in the Ziploc bag in the picture below.
- Allow dye to set for at least 8-12 hours. For the brightest colors and best color retention, allow dye to set for 24 hours.

- After 8-24 hours, remove socks from the plastic bag or wrap.
- Rinse each sock, if separate, or socks, if scrunched and secured together, under warm water until the water runs clear.
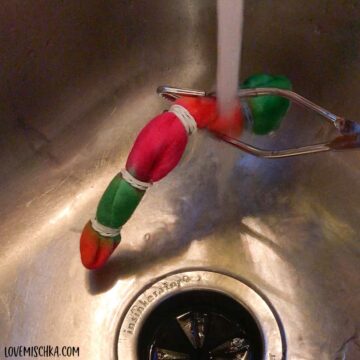
- Carefully cut the rubber bands and unravel the sock or socks.

- Rinse again to remove any additional excess dye.
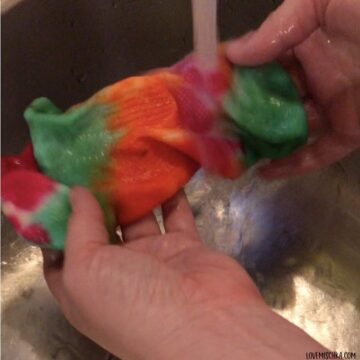
- If doing one sock at a time, place that sock aside on a flat surface. Do not place it on any other socks, fabrics, or anything that can be stained. The wet dye will transfer.
- Repeat steps 14-16 with the other sock in the pair, if needed.
- Wash the socks. I washed each pair of socks by hand. If you’re comfortable throwing them in the washing machine, you can. Wash them with a little detergent for a full cycle.
- Dry the socks. I hung my socks on the line, but you can also put them in the dryer.
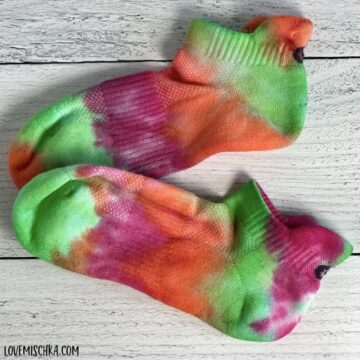
- Enjoy your fun, unique socks!