
Learn how to make salt dough ornaments (and handprints) with this easy DIY guide that includes everything you need to know about baking, decorating, and storage. It’s a fun Christmas craft for kids and adults to enjoy for years to come!

This post contains affiliate links. This means, if you click a link and make a purchase, I may earn a small commission at NO extra cost to you. This helps to support the blog. Thank you❤️
Making Salt Dough Ornaments is a long-standing Christmas tradition. I still have salt dough ornaments that I made as a kid. With the right care, they seem to last FOREVER so you can cherish, reminisce, and enjoy the warm memories for years to come.
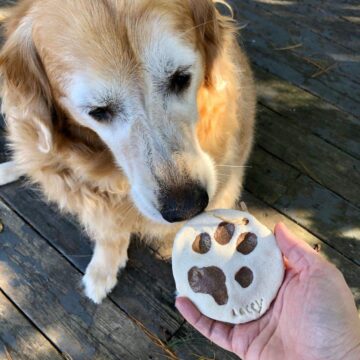
Want a keepsake of your pet or just to include them in this family tradition? Check out DIY Paw Print Ornaments.
These easy, homemade ornaments also make great, inexpensive, heartfelt gifts for family and friends.
In 2013, I made handprint ornaments with my cousin’s son with this salt dough recipe. We painted them as Santa and Rudolph. Well, I did. He was only two, so he just brushed random colors on the ornaments. He had SO much fun though. It really is a great activity for kids of all ages.
Anyway, we wrapped the finished ornaments and gave them to my mom, his moms, and his grandma. They all loved them SO SO SO much. We still have them too!
For more holiday DIY ideas, check out:
- DIY Cinnamon Salt Dough Ornaments (No Applesauce)
- How to Make DIY Reindeer Gift Bags
- How to Make DIY Reindeer Candy Canes
- Christmas Pretzel Rods Recipe
- Free Christmas Bingo Printable
The BEST Salt Dough Recipe
This recipe has only THREE ingredients that you probably already have in your kitchen - flour, salt, and water.
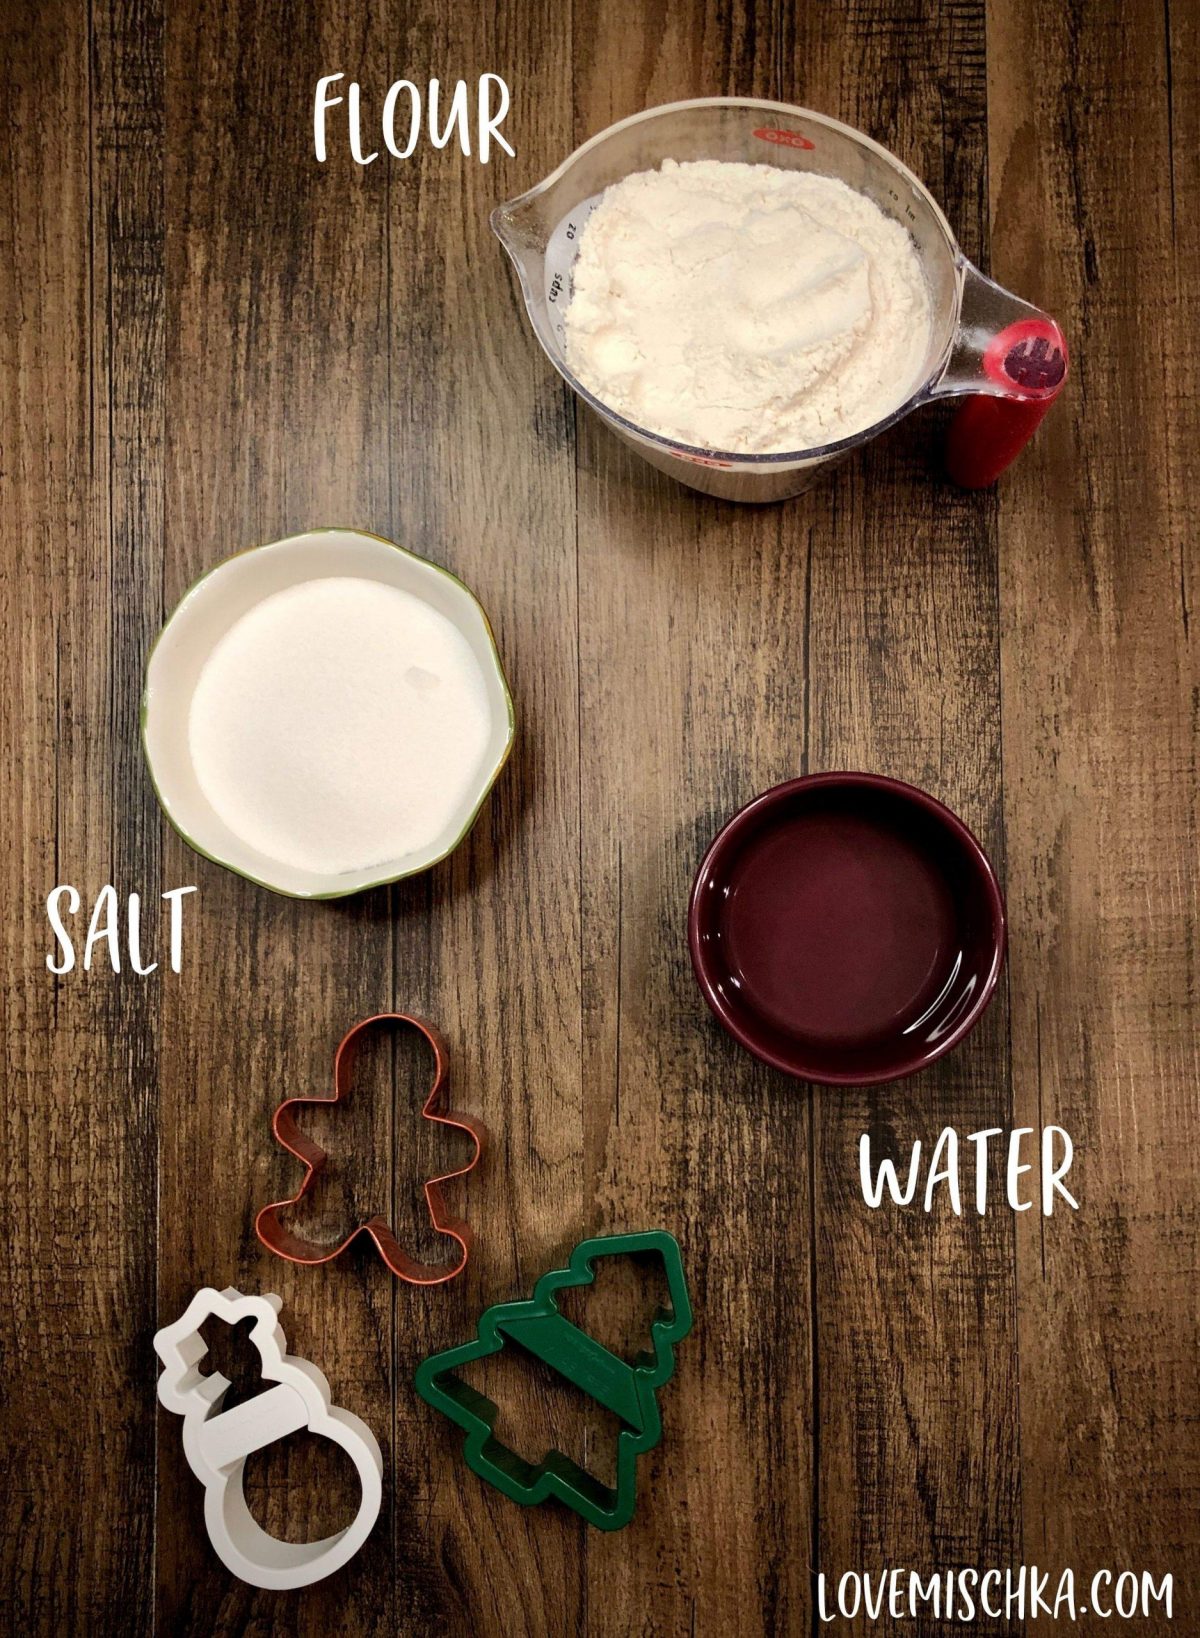
All you have to do is combine the three to form a dough. It’s SO easy.
This salt dough recipe is also the best because it creates ornaments, handprints, and other keepsakes that LAST. They are sturdy, durable, and long-lasting.
The salt dough is also versatile. It can be made into any shape you like. It also responds well to imprinting, whether it be with your child’s hand, your pet’s paw, or a stamp.
I LOVE to use stamps while making ornaments. Please see my post - DIY Cinnamon Salt Dough Ornaments (No Applesauce) - and below for more details.
This salt dough recipe also provides a smooth, clean surface to be painted or decorated any way you like.
You and your loved ones can easily customize each ornament and have fun doing it!
How to Make Salt Dough Ornaments
Combine flour, salt, and water until a dough forms.

If the dough is too wet and sticky, knead in a little more flour. If the dough is too dry and crumbly, add a little more water. Some brands of flour absorb water differently, so this is to accommodate any possible difference.
The dough should be soft, malleable, and easy to work with.
Sprinkle flour on a sheet of parchment paper then plop a big ball of salt dough.
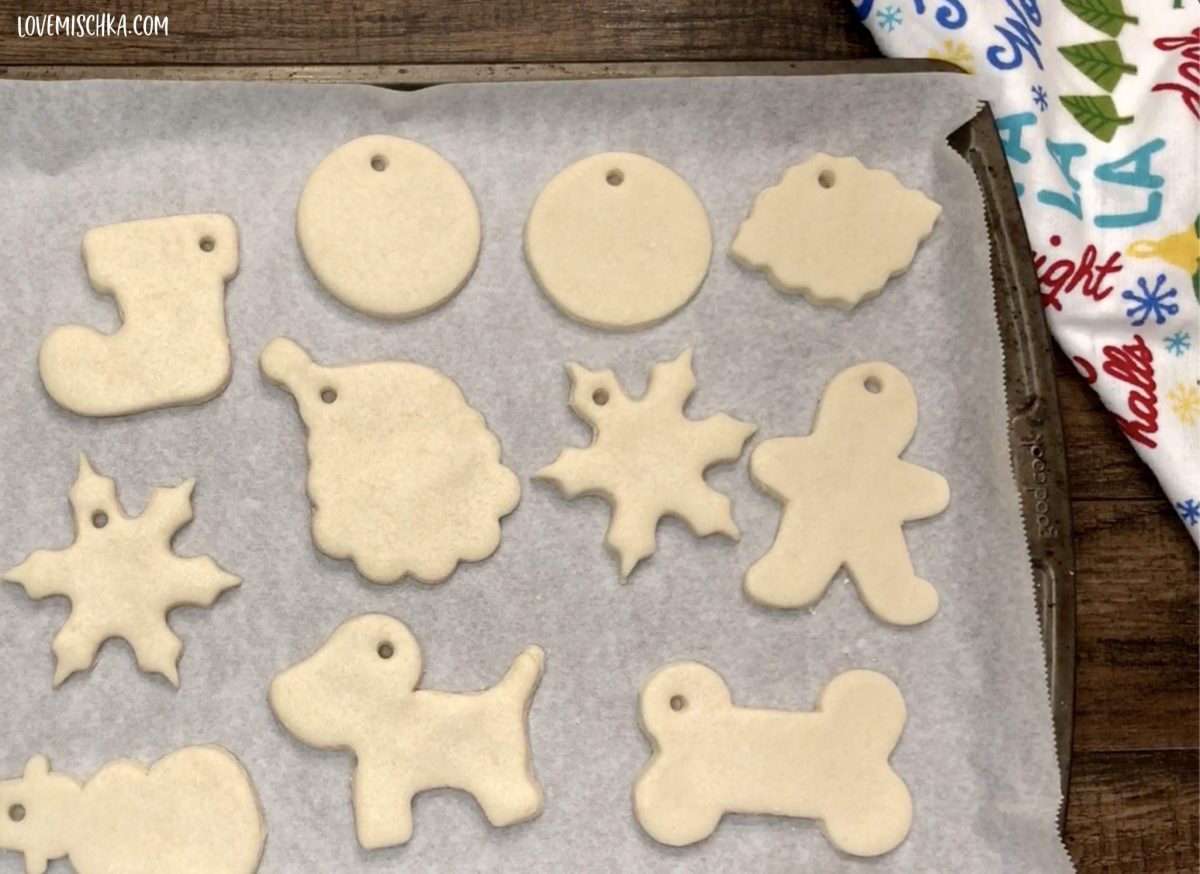
Roll it out with a rolling pin until it’s ¼-inch thick for ornaments or ½-inch thick for handprints, footprints, or paw prints.
Cut shapes into the dough with cookie cutters. I always recommend this Wilton Cookie Cutters Set because it’s my absolute favorite. It includes shapes for so many different holidays, events, interests, and more.
I also love to use this Snowflake Cookie Cutter Set to make ornaments. A simple, white, sparkly snowflake salt dough ornament is GORGEOUS.

“Cookie Stampers” like in this 3D Cookie Cutters Set or this Cookie Cutters Stamps Set are also great to make homemade ornaments with. I used a couple to make these DIY Cinnamon Salt Dough Ornaments. They create very clean lines of design, which is great if you don’t want to paint the ornament or if you don’t trust your own painting skills.
Place the cut shapes on a parchment-lined baking sheet.
What to do Before Baking
STAMP!! If you plan to use stamps to create imprinted designs on your salt dough ornaments, it is important to do so before baking the ornaments.
This year, I bought the following stamps from Michaels. I love the way these ornaments came out!!
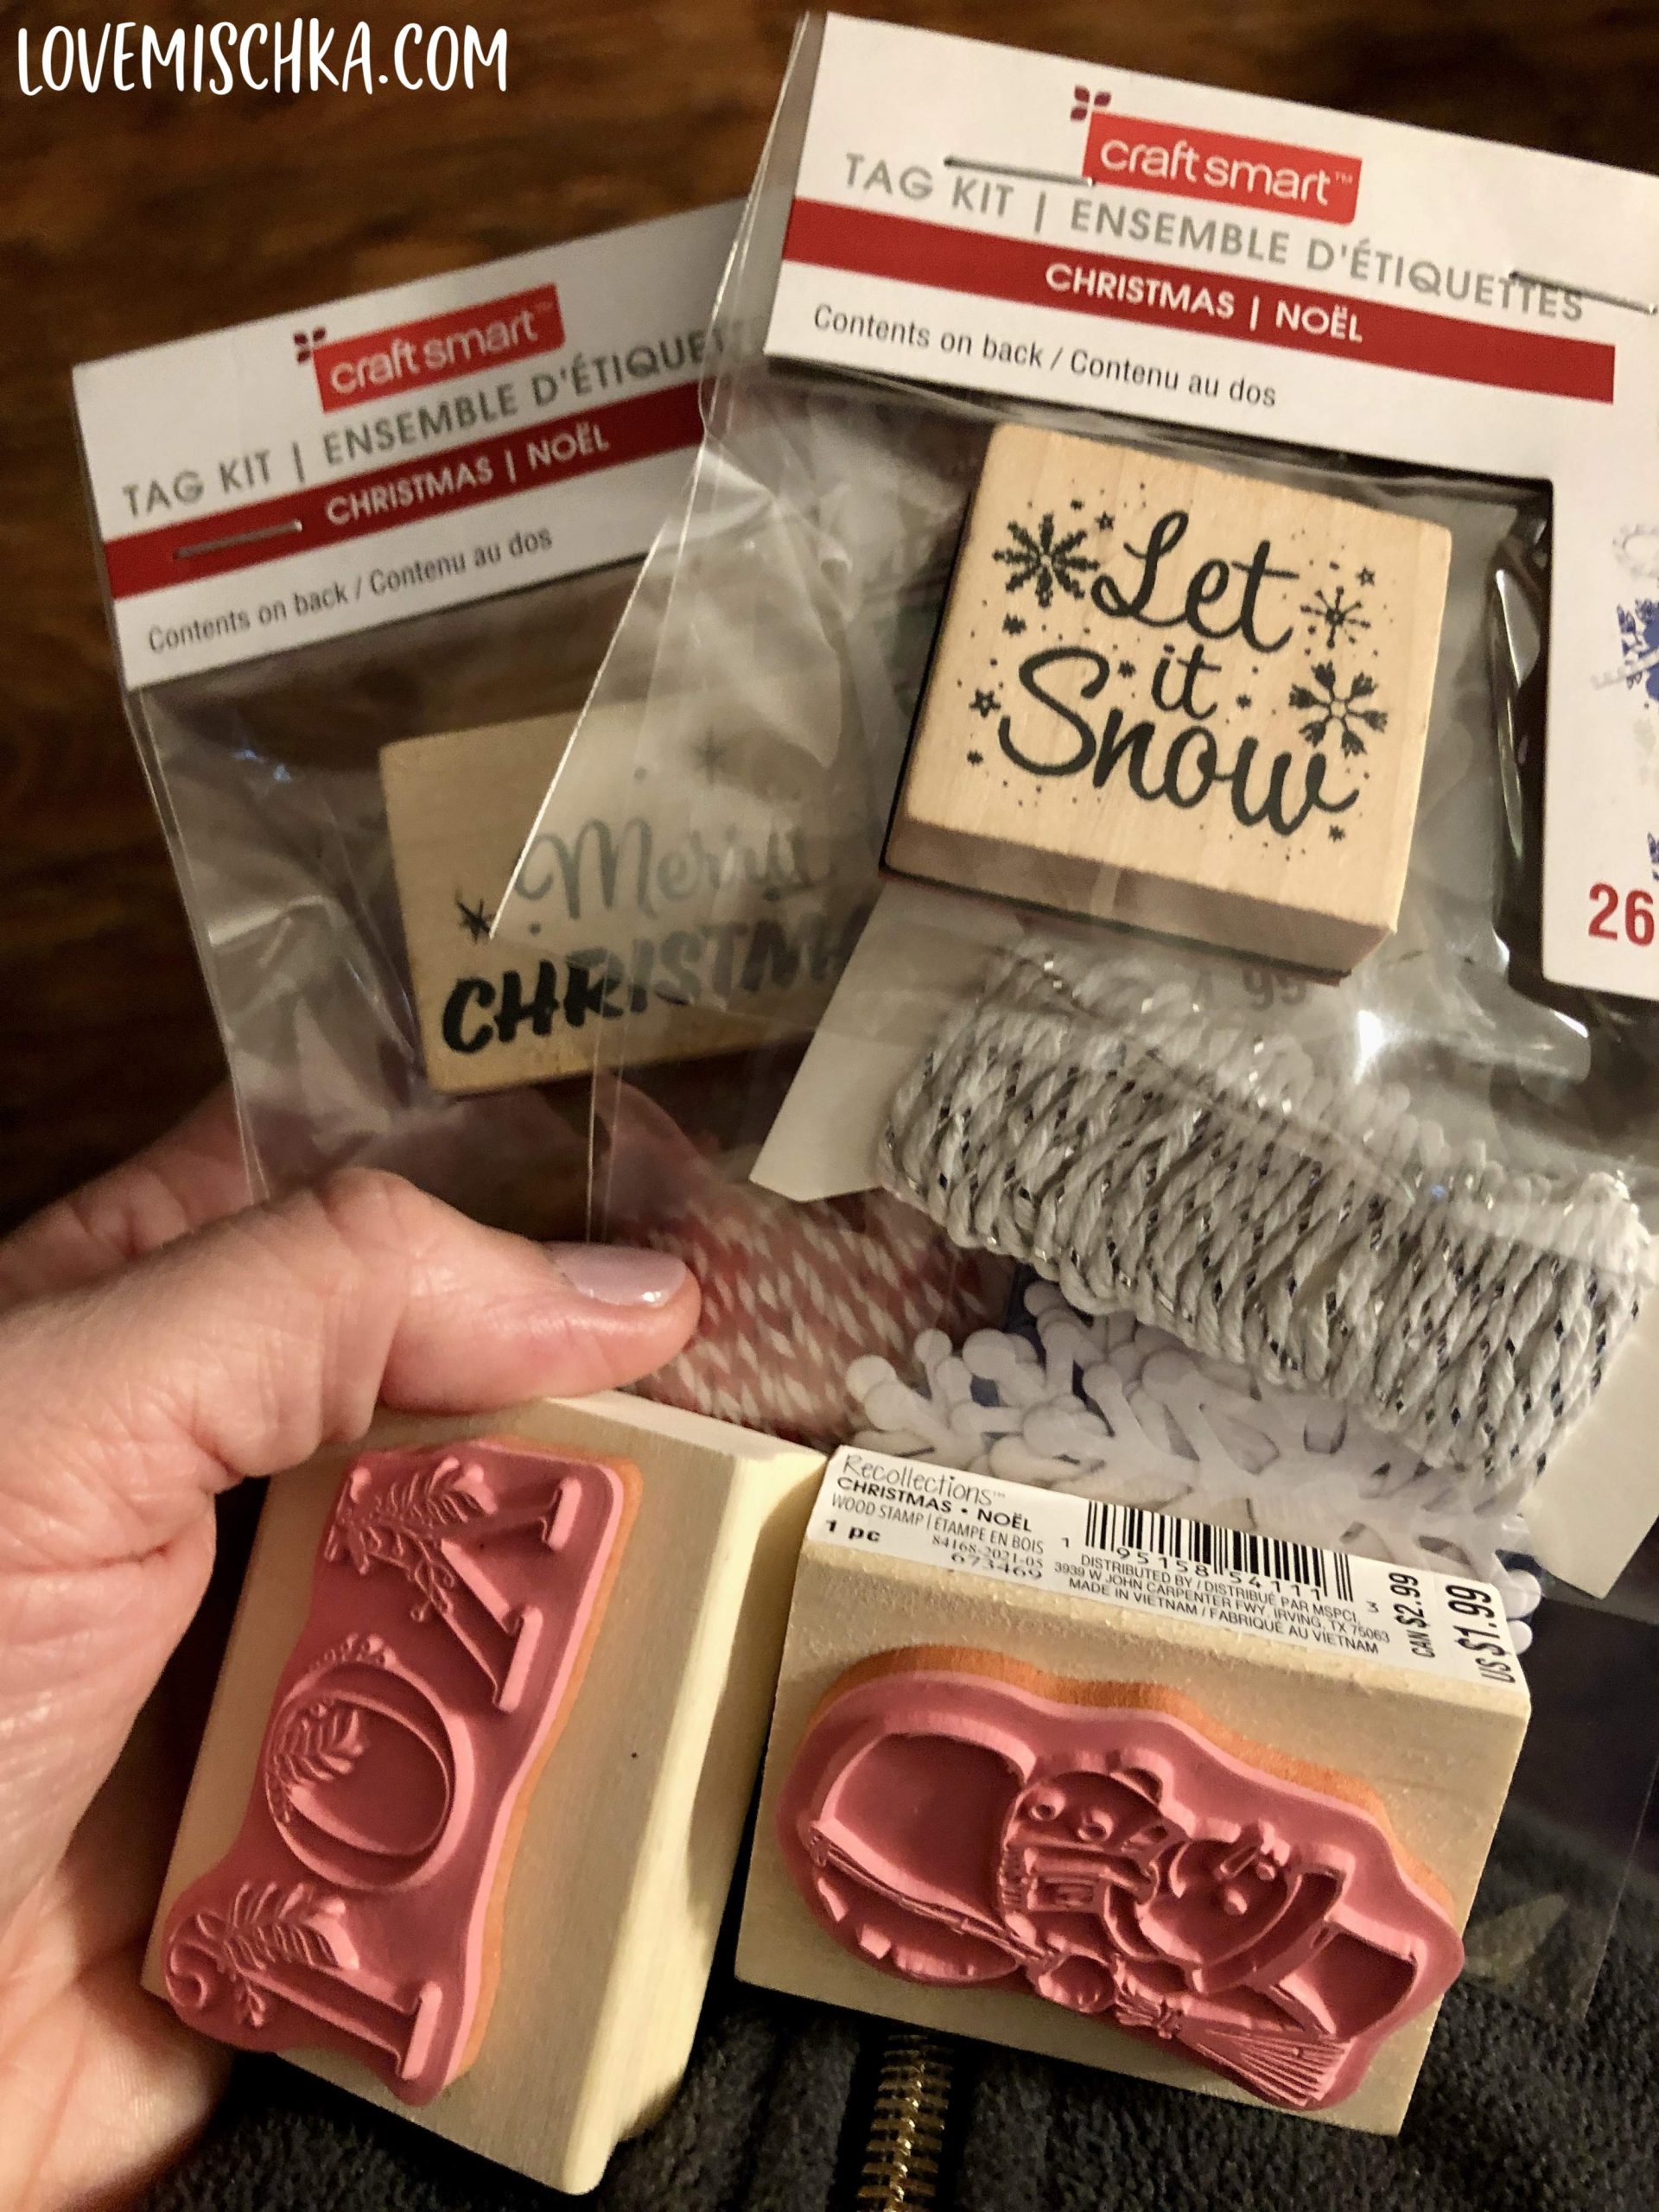
If you love Michaels as much as I do, click here to receive 20% off All Regular Price Purchases.
After baking, I like to use Ultra Fine Point Sharpies to fill in the stamp’s design on the ornament. This works SO SO well. It’s definitely easier than painting the small lines.
In the past, I used stamps like these wooden animal stamps to create simple, custom ornaments for my loved ones.
If you are making a handprint ornament, this is the time to press the hand (or foot or paw) into the dough.
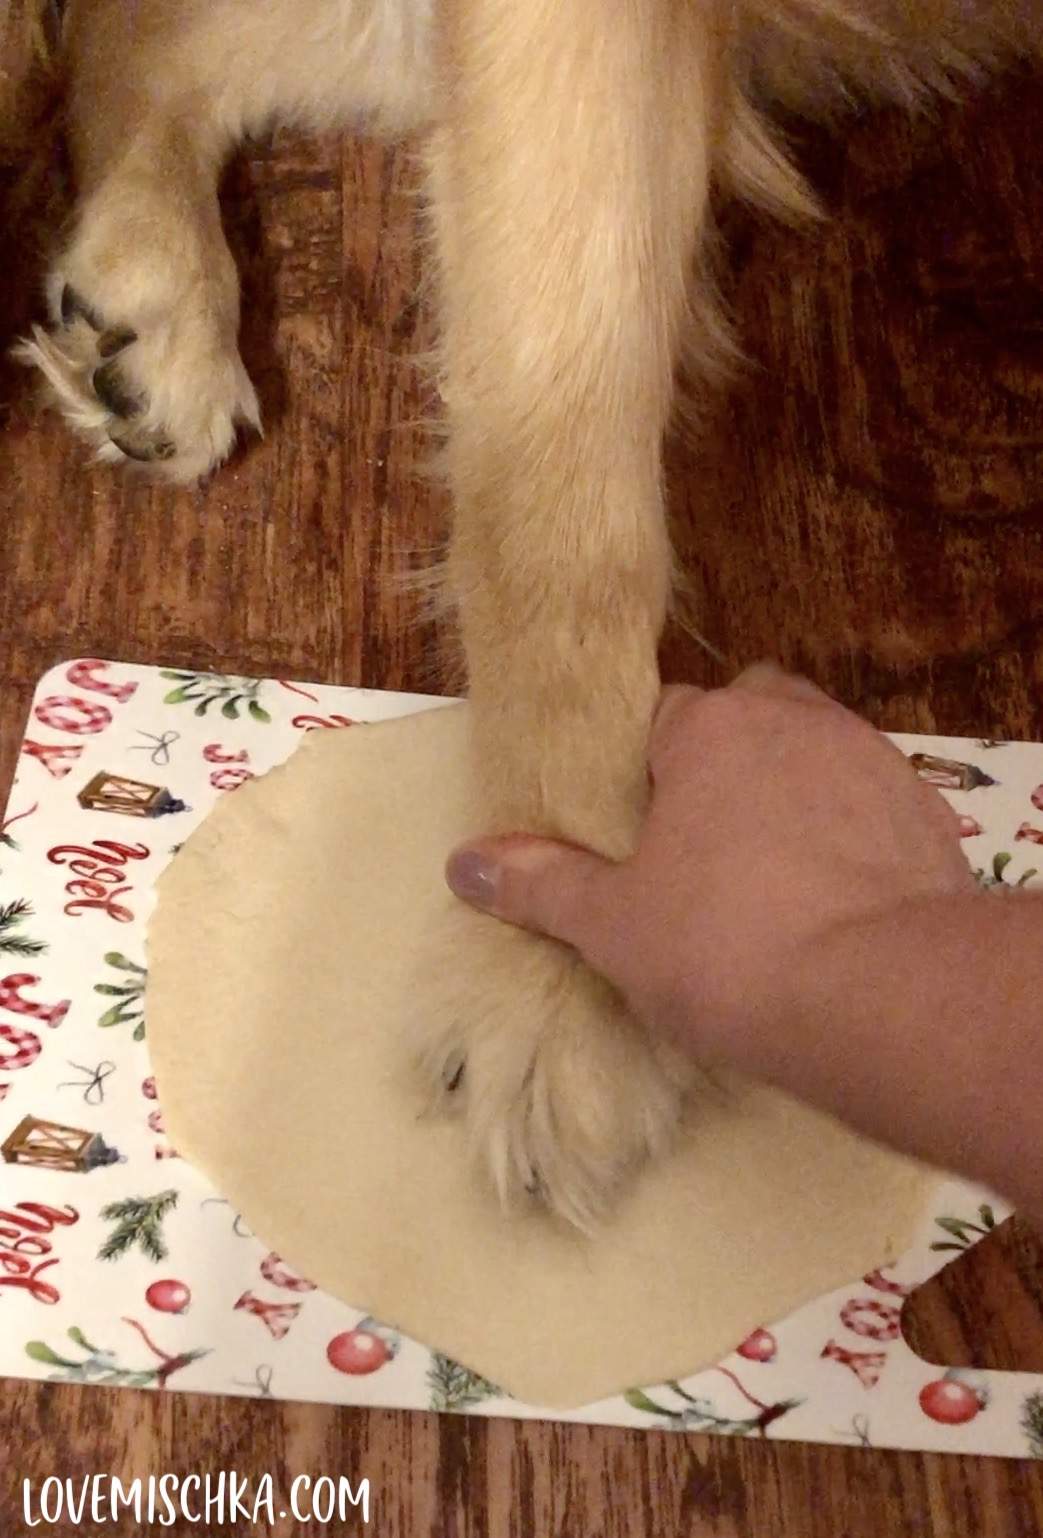
With my DIY Paw Print Ornaments, I pressed my dog’s paw into the dough before using a cookie cutter to cut around it. Some people do it the opposite way though. They cut a shape with a cookie cutter then press the paw, hand, or foot into the center of the cut piece. Either way works.
You can also cut around the handprint in the dough with a butter knife. This creates an ornament of JUST the handprint. This is how I made the Santa handprint ornaments that I mentioned in the beginning.
Remember to make a hole for hanging before baking!
If you plan to hang these salt dough ornaments on the Christmas tree, it is important to make a hole at the top of each ornament before baking.
This is incredibly hard to do after baking. Whenever I’ve tried, I cracked the ornament or it just looks too crumbly and messy.
The best way to make a hole in the dough is with a straw. It creates a clean, perfectly even and sized hole for ribbon, thread, or twine.
If you don't have a straw, you can use a pencil, toothpick, or turkey lacer.
How do you know when salt dough is done?
You’ll know the salt dough ornaments are done when they are dry, hard, and a consistent color. If they still feel soft after baking for the time indicated, bake them longer.
The ornaments should be firm without any give.
Why is my salt dough puffing up?
Sometimes, this randomly happens. It’s very interesting.
In my experience, if my dough is too wet or thin, it will puff up.
I used to fix little cracks or mess ups in my cut dough pieces by adding a drop of water in the area and smoothing it with my finger. I noticed where I did this, especially if I used a lot of water, would puff up.
It’s also important to make sure the salt dough is rolled to an even thickness before baking. This ensures the ornaments bake evenly and seems to prevent any puffing.
Salt Dough may also puff up if you use self-rising flour instead of all-purpose flour.
How to Decorate Christmas Salt Dough Ornaments
After baking, let the ornaments cool before decorating.
The most common way to decorate handmade ornaments is with Acrylic Paint.
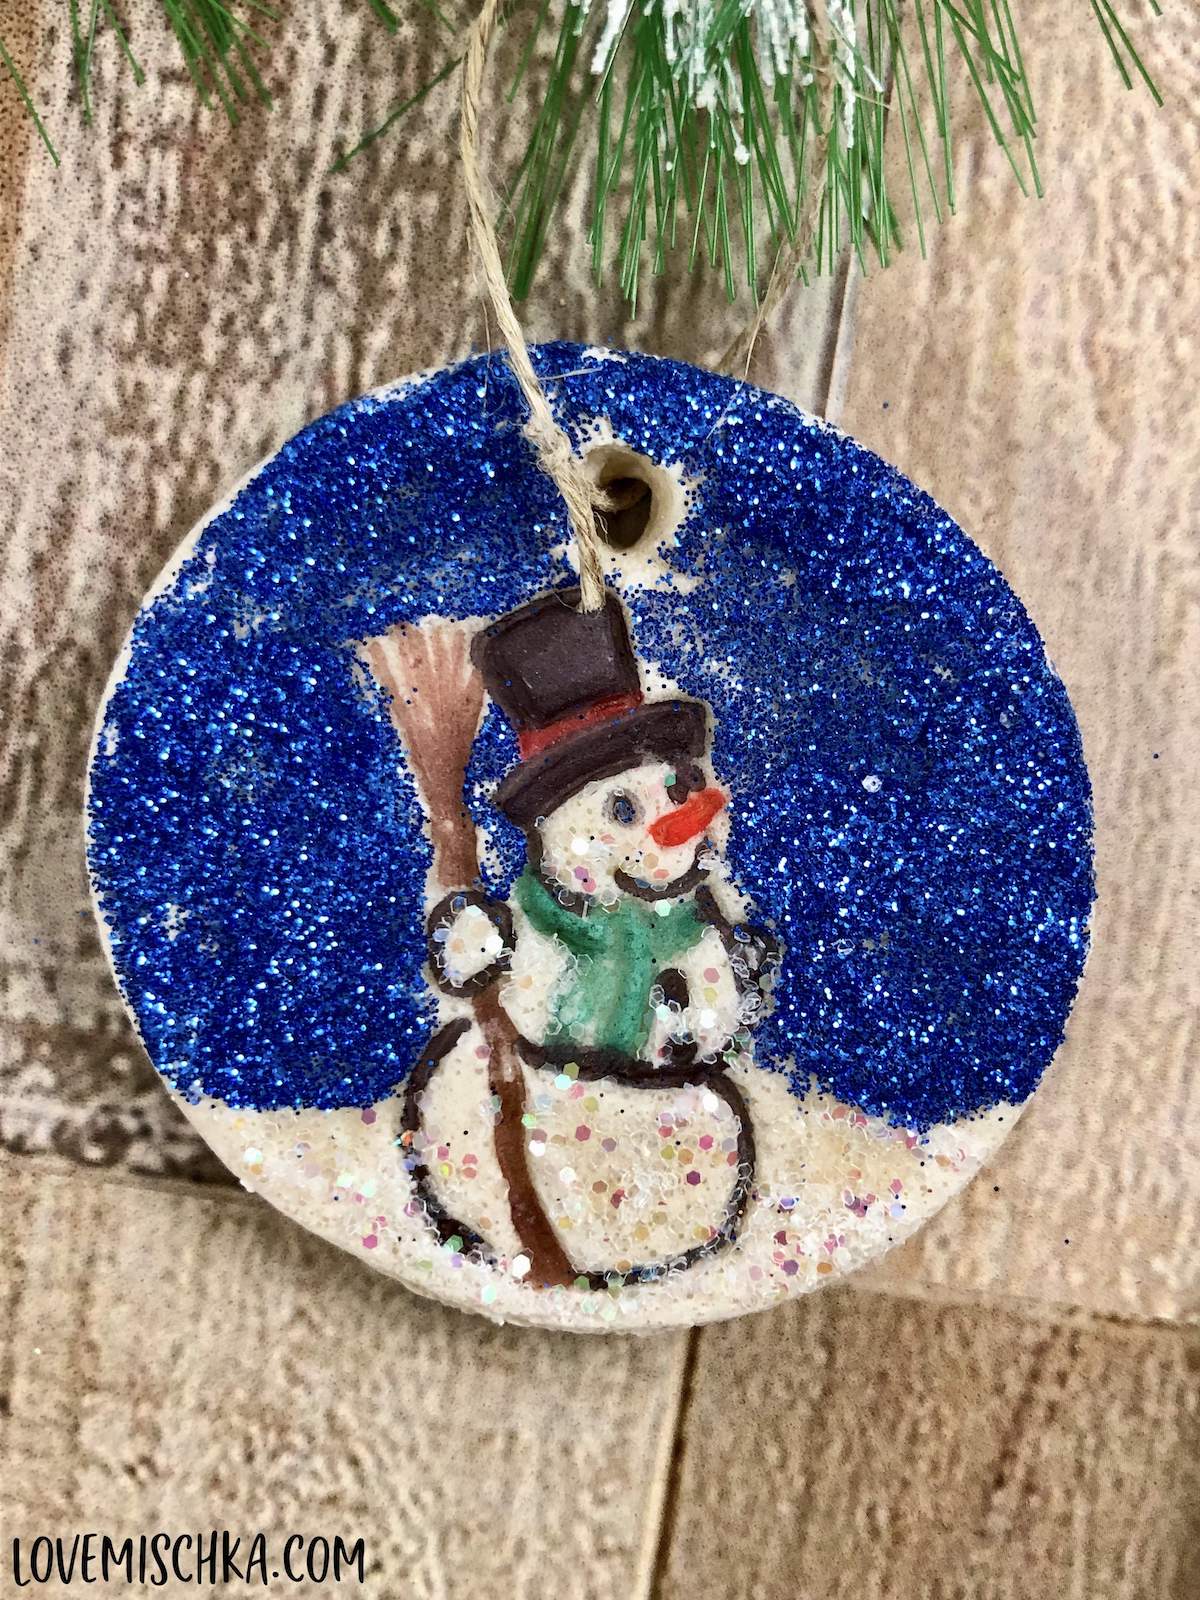
Some people like to paint the entire ornament with white acrylic paint as a base coat before adding their desired colors and designs. I don’t do this. If I plan to use glitter, I usually paint a base coat that is the same color as the glitter. This is so the natural color of salt dough won’t peek through the sparkles.
Sometimes, I like to add a coat of FolkArt Extreme Glitter Acrylic Paint over certain painted areas (after the first coat of regular paint dries). This adds a more subtle sparkle and shine to Christmas Ornaments. It also allows me to emphasize specific parts of the ornament.
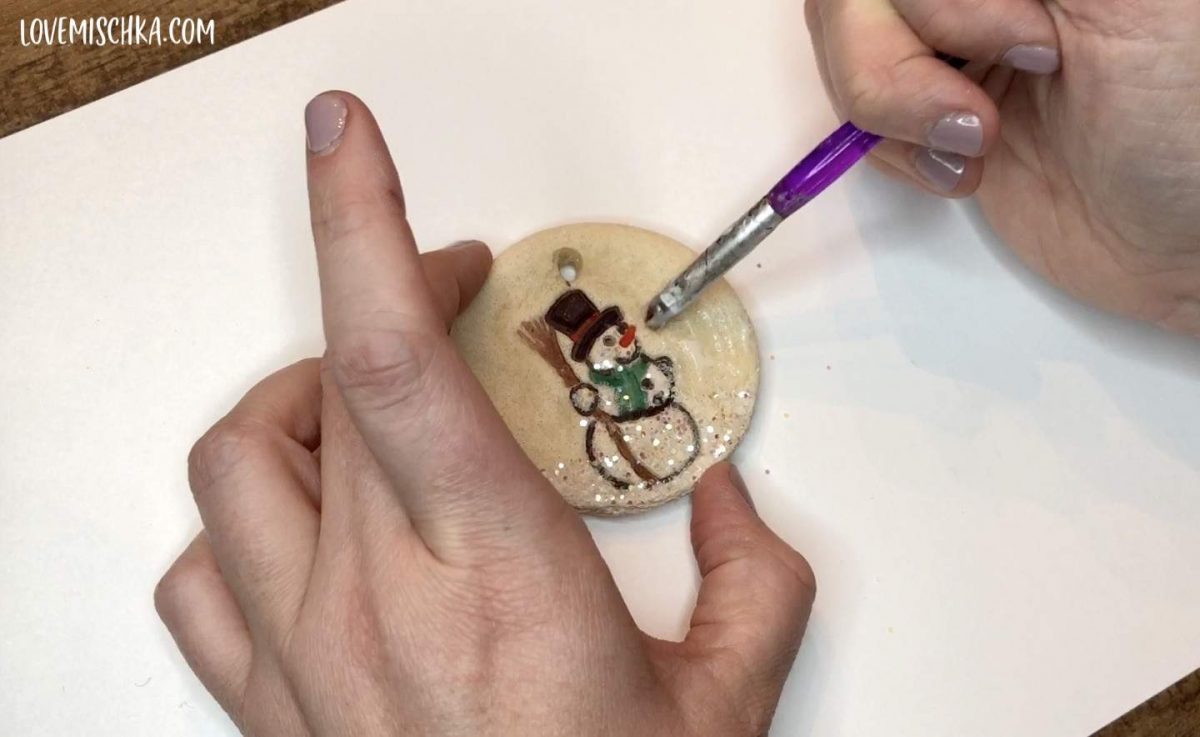
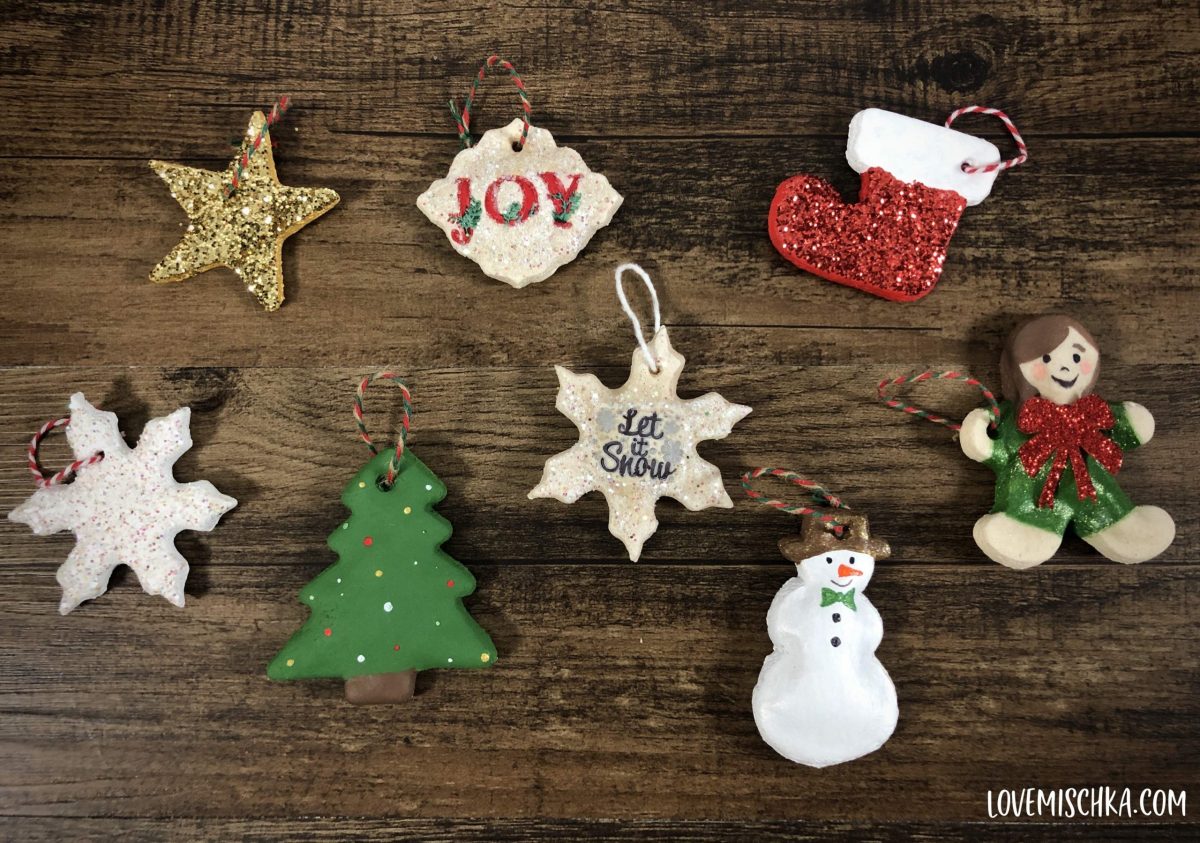
For example, with the Snowman Ornament below, I used FolkArt Extreme Glitter Paint on his hat, nose, and bow. Isn’t he cute?!

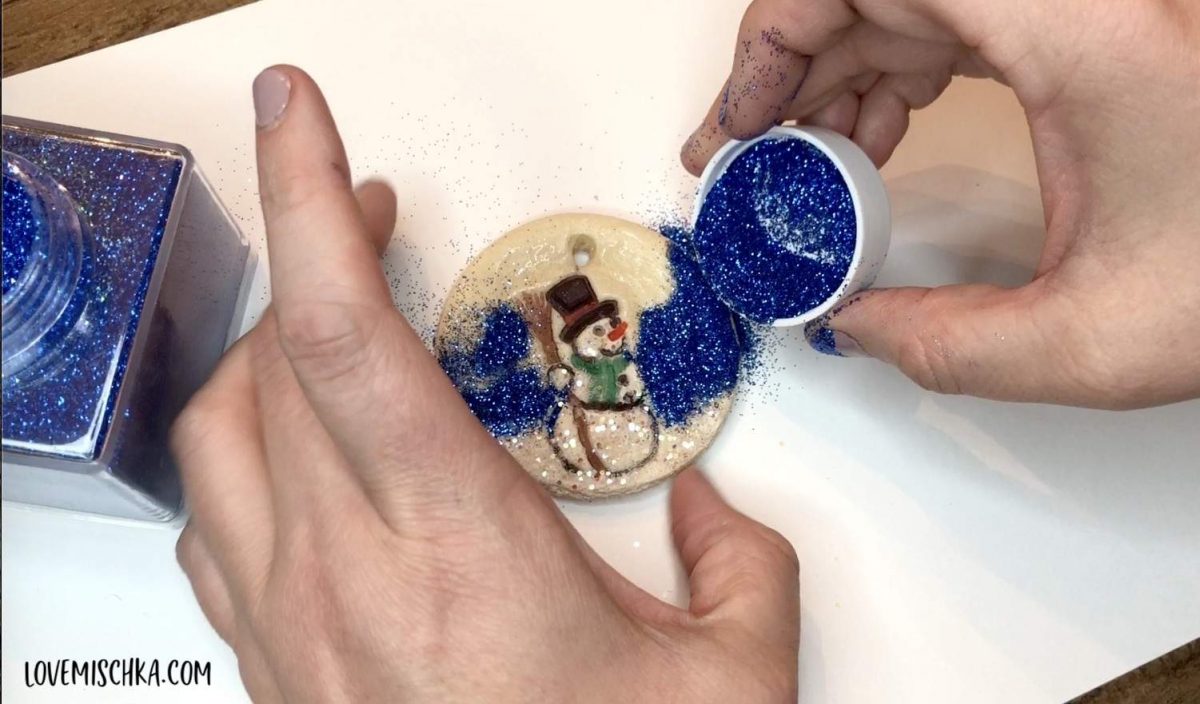
For me, glitter is always a must. Especially at Christmas. As I stated above, I usually first paint the ornament the same color of the glitter I plan to use.
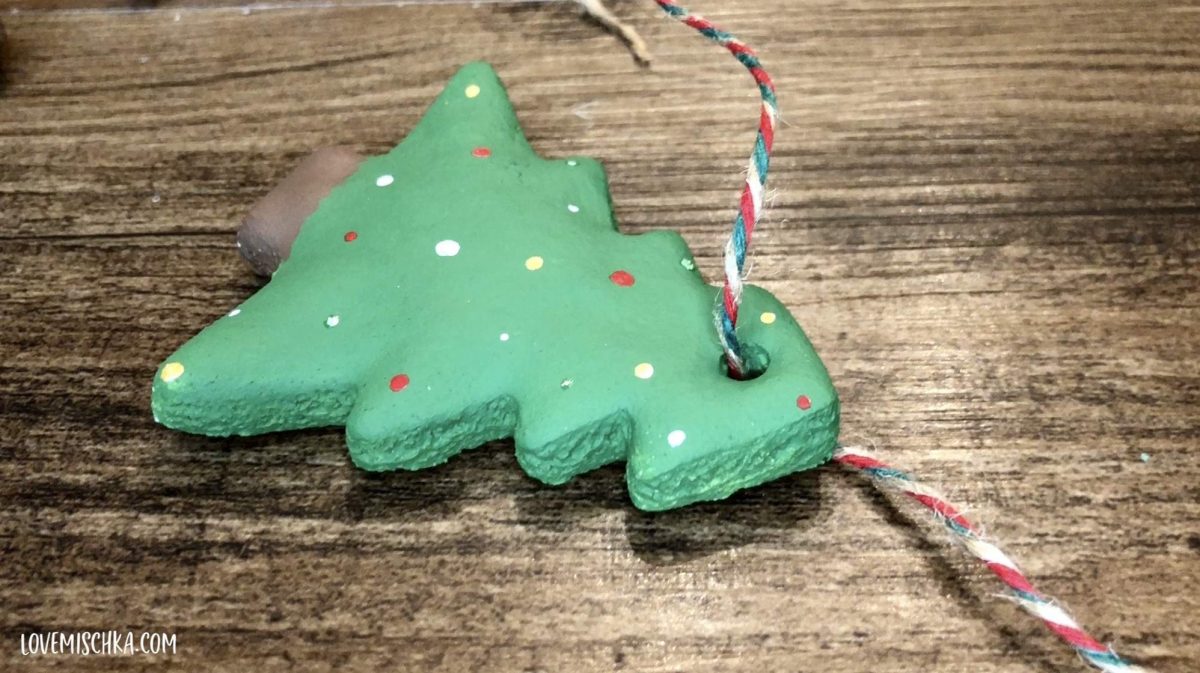
For example, with the Christmas Tree Ornament below, I painted it green. Let it dry. Then added green glitter.
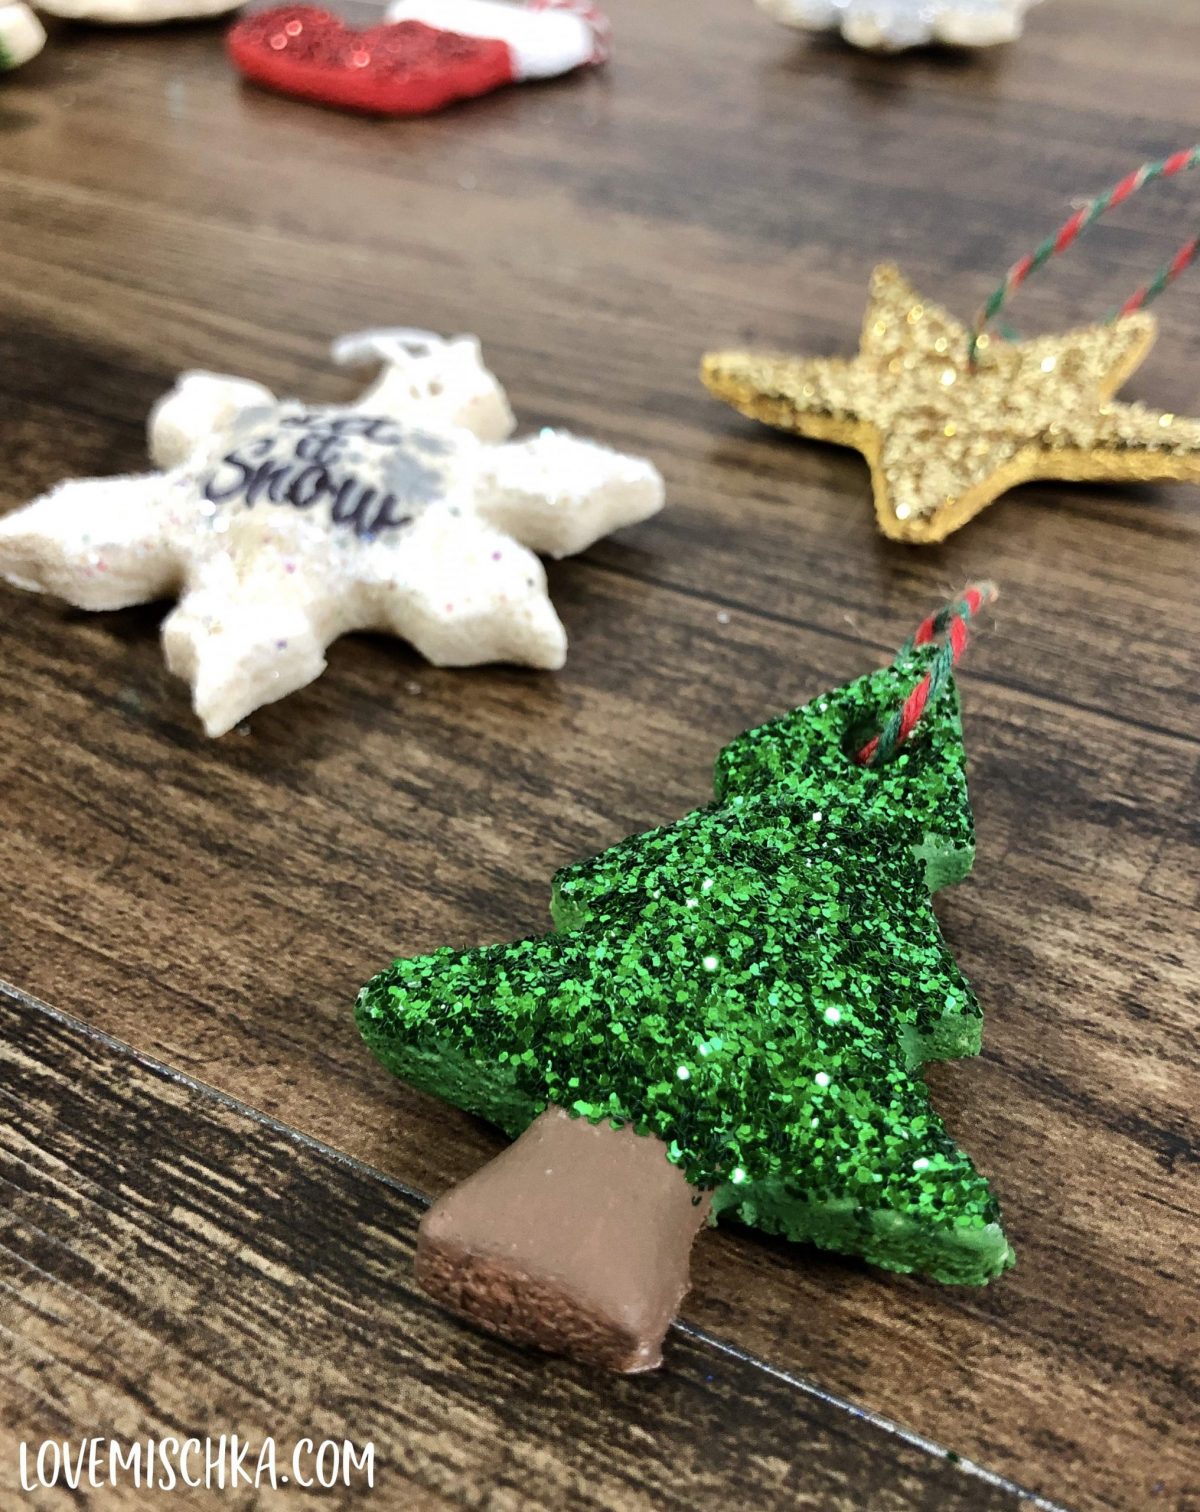
After the paint completely dries, I use a paint brush to spread Elmer’s Glue wherever I want the glitter to be. Then I pour the glitter over the wet glue.
Lightly pat it down. Wait a few seconds then turn the ornament over to discard loose glitter.
I always do this over a clean sheet of cardstock. This makes it easier to save the extra glitter. I just fold the paper to collect the glitter in the middle then pour it back into its container.
Glitter can make the most simple designs awe-worthy!

Use a combo of Sharpies and Glitter!
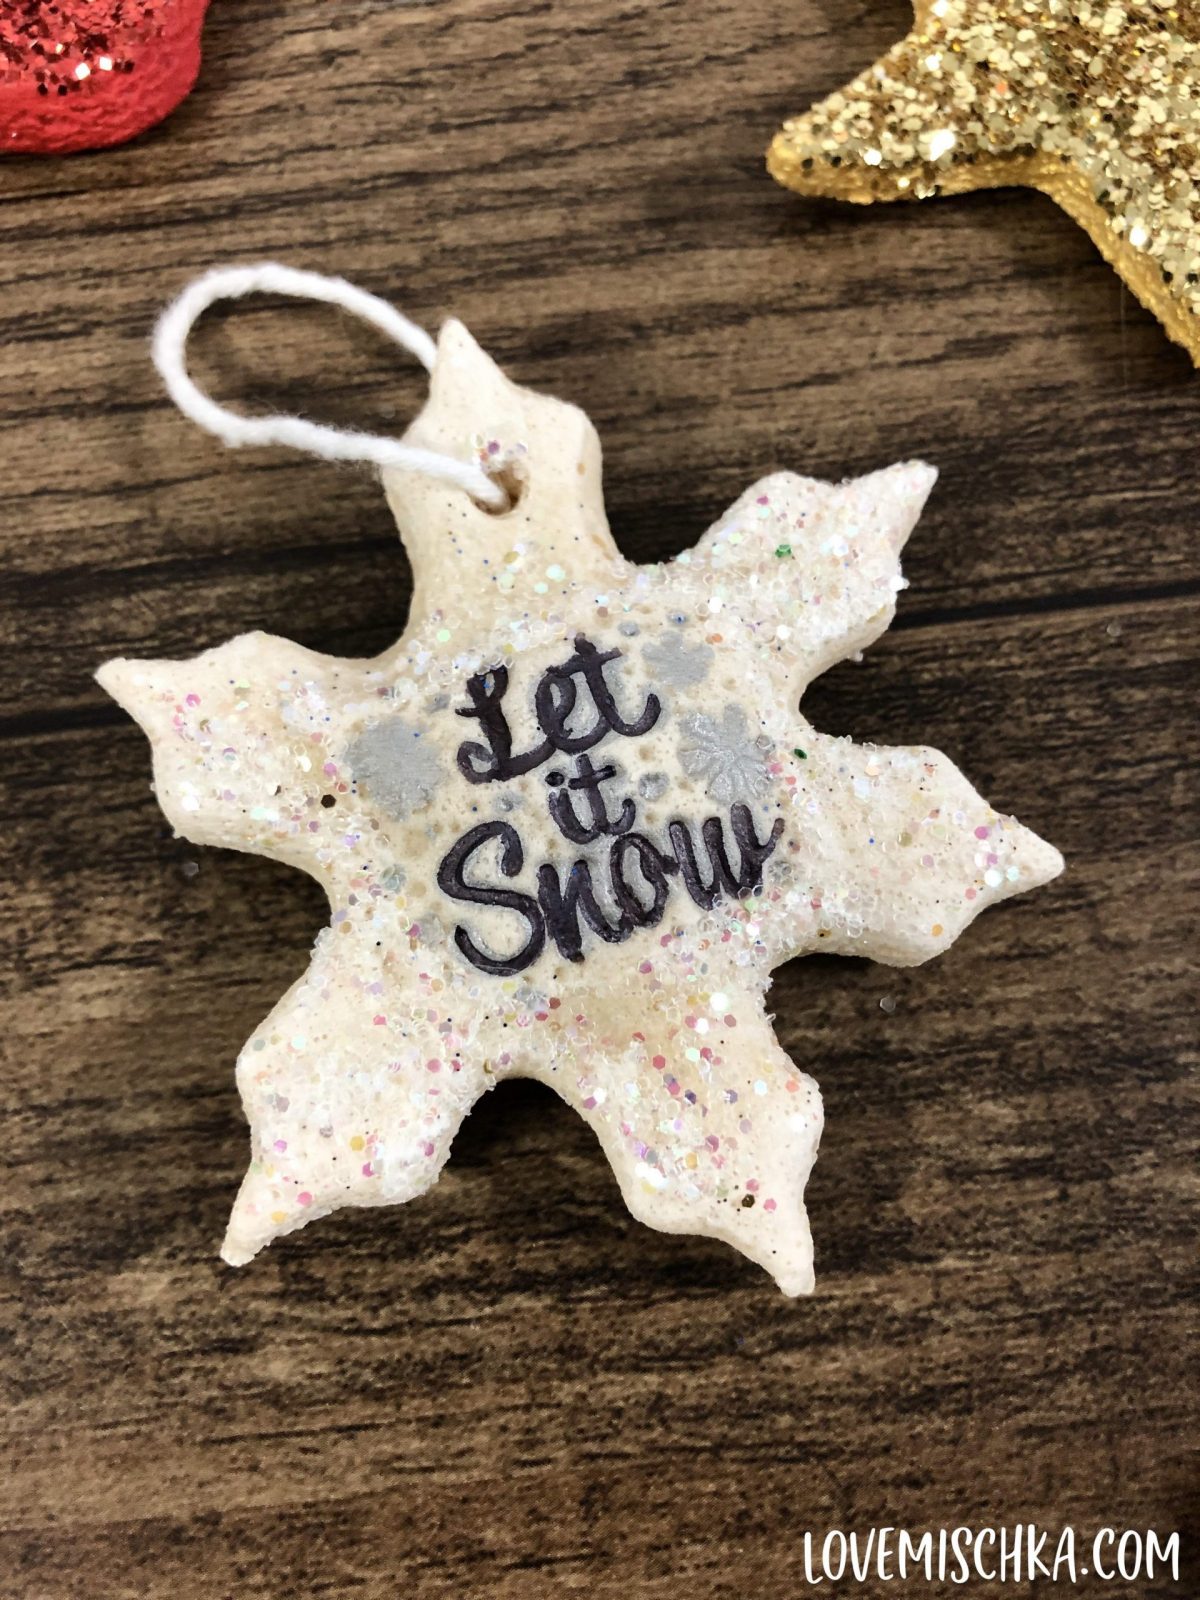
For the salt dough ornaments that I stamp, I like to use a combination of sharpies and glitter for a more detailed, exciting design.
First, I use Ultra Fine Point Sharpies to color in the imprinted design on the ornament.
Then, I use a paint brush to spread glue exactly where I want the glitter to be. I prefer to use a small brush so I can be concise.
Next, I pour glitter over the glue and do the usual glitter steps like I stated before.
I will repeat these steps for each color of glitter.
When glitter gets stuck on the sharpie colored areas of the ornament, I use a toothpick to try to remove it and/or blow on it. As long as there's no glue in the spot, the unwanted glitter should move.

If you’re worried about shedding loose glitter everywhere, you could set it with Clear Acrylic Sealer or Mod Podge. I don’t usually do this. I never experience enough shedded glitter that it's an issue. It's just a random sparkle here and there.
I also think sealers decrease the shine and sparkle of my glitter ornaments. But, it's possible I'm just applying them wrong. 🤷🏻♀️
How to Hang Handmade Christmas Ornaments
Just slide twine or ribbon in the hole you made before baking. Cut at your desired length (you can do this before or after threading it through the ornament).
Tie the ends of the twine or ribbon together and knot, creating a loop to hang the ornament from.
I prefer to use twine, like these Rolls of Christmas Twine - Natural Jute String.
It seems to be more durable than ribbon or thread.
How long do Salt Dough Ornaments last?
YEARS! I have salt dough ornaments from my childhood that still look great. I'm not going to say my age... but, it's been awhile. 😂
I have never sealed any of my salt dough ornaments and they still last forever without any mold or fading.
Some of the paint on the salt dough ornaments that I made in 2013 started to chip last year. It took 7 years to happen though without any seal. The ornament itself is still in one piece.
To ensure the longevity of these salt dough ornaments, make sure they are properly dried to begin with. They should be dried all the way through. No soft, mushy dough in any spots.
Another way to ensure these salt dough ornaments last for years is to wrap them in bubble wrap between uses and store them in a container that won’t be exposed to excess moisture. We use a plastic storage bin with a lid.
Make some Christmas cookies too! Check out these holiday favorites:
- Easy Hot Cocoa Cookies – Made with Hot Chocolate Mix
- Easy Funfetti Cookies from Scratch (Use red, white, & green sprinkles instead of rainbow!)
- Snickerdoodle Cake Mix Cookies
- Easy Christmas Fudge Recipe
How to Make Salt Dough Ornaments (and other Keepsakes)
Ingredients
- 2 cups Flour all-purpose
- 1 cup Salt iodized
- 1 cup Water warm
Instructions
- Preheat oven to 300°F.
- In a mixing bowl, combine flour, salt, and water until a dough forms.
- Knead the dough until it is soft and easy to work with.
- Sprinkle flour on a sheet of parchment paper.
- Plop the salt dough on the sheet and roll it out with a rolling pin until it's about ¼" thick for ornaments or ½" thick for handprint keepsakes.
- Cut shapes in the dough with cookie cutters.
- Place cut pieces on a parchment-lined baking sheet.
- If using stamps or making handprint ornaments, press the stamp or hand in the dough now.
- With a straw, poke a hole in the top of each ornament for hanging.
- Bake for about an hour or until the dough is firm and dry.
- Let cool completely.
- Decorate as you wish!
- Cut twine (or ribbon) to desired length. Slide it through the hole at the top of the ornament. Tie the ends of the twine together and knot. This creates a secure loop to hang the salt dough ornament from!
- Hang the salt dough ornaments on your Christmas Tree or use as handmade gifts for family and friends.
Video
If you make these Salt Dough Ornaments, I would love to see them! Please tag me @lovemischka on Instagram, Facebook, or Pinterest.
I hope you have a truly wonderful holiday season! 🎄☃️❤️


Leave a Reply