
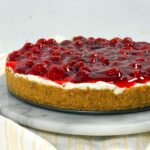
Learn how to make cherry cheesecake with this super simple recipe. It only takes 15 minutes to prepare, but this no bake cherry cheesecake will look and taste like it took hours.

This post may contain affiliate links. This means, if you click a link and make a purchase, I may earn a small commission at NO extra cost to you. Thank you so much! 🍒
This simple cherry cheesecake recipe is insane.
It requires very little effort, but tastes amazing.
It also looks good enough to serve on special occasions! Last time I brought it out at a family gathering, I heard ooo’s and aaah’s.
No Bake Cherry Cheesecake Recipe
This is the easiest cheesecake recipe because it uses simple ingredients, doesn’t require any fancy techniques or equipment, and it’s no bake!
It doesn’t require any baking at all.
Looking for more no bake recipes? Check out these Cocoa Puff Cereal Bars or these Froot Loops Treats.
It’s one of those easy no bake desserts that are perfect during the holidays when your oven is full of turkey, casseroles, and lots of other food.

No-bake cheesecake does have a different texture than traditional cheesecake.
It is light, smooth, and creamy. No bake cheesecake is more like a mousse.
Baked cheesecake has a texture that is closer to a custard. It is more dense and velvety.
Both are absolutely delicious.
BUT, no-bake cherry cheesecake doesn’t have to be baked in a water bath. Which is a HUGE plus for me.
It can also be made in any type of pan - a square baking dish, a springform pan (my favorite to use), or a cupcake pan/little cups for mini cheesecakes.

How to Make Cherry Cheesecake
The first step is to melt butter.
In a medium bowl, combine graham cracker crumbs, brown sugar, and melted butter. This is the delicious graham cracker crust.
Once combined, press the mixture into the bottom of a 9-inch pan (or whatever you’re using). Pack it tight.
Freeze for 10-20 minutes while you prepare the creamy cheesecake filling.

I like to mix the cream cheese, powdered sugar, lemon juice, vanilla extract, and cool whip in a stand mixer, like this KitchenAid Classic Series Stand Mixer.
Using an electric mixer, which can be a hand mixer, helps to create a creamy filling.
If you mix the cream cheese mixture by hand, it may not be as fluffy, airy, or creamy.
When the cheesecake filling is ready, put it on the cooled crust in an even layer. You can use a rubber spatula to smooth it out.
Cover the cheesecake with plastic wrap and chill in the refrigerator for at least 4 hours. I like to chill it overnight.
Before serving, add the cherry filling on top of your cheesecake.
To keep this great recipe super easy, I use a can of cherry pie filling.
The tartness of the cherry filling balances the sweetness of the rest of the cheesecake in such a delightful way.
If you would like to use a homemade cherry pie filling, that works too!

Tips for the Best Cherry Cheesecake
- Pack the crust tightly in the pan until firm. This will prevent it from breaking apart when you cut the cheesecake later.
- Use room temperature ingredients for the cheesecake layer.
- Use full-fat cream cheese for the creamiest cheesecake. Fat-free cream cheese isn’t as rich and will definitely change the texture and taste.
- I also recommend using block-style cream cheese. The tubs usually have more water, which could make the cheesecake runny. Ick.
- Chill in the refrigerator overnight for best results.
- Add the cherry topping right before serving.
- Store any leftovers in an airtight container or a covered baking dish in the fridge for up to four days.

For more easy dessert recipes, check out:
- How to Make Blueberry Crisp from Scratch
- Maraschino Cherry Cookies
- Carrot Cake Bars {Swirled with Cream Cheese}
How to Make Cherry Cheesecake
Ingredients
Graham Cracker Crust
- ½ cup Unsalted Butter melted
- 2 cups Graham Cracker Crumbs
- ¼ cup Brown Sugar
Cheesecake Filling
- 16 oz Cream Cheese room temperature
- 1 cup Powdered Sugar
- 1 teaspoon Vanilla Extract
- 1 teaspoon Lemon Juice
- 8 oz Cool Whip thawed
Cherry Topping
- 21 oz Cherry Pie Filling
Instructions
Graham Cracker Crust
- In a medium mixing bowl, completely combine the melted butter, graham cracker crumbs, and brown sugar.
- Pour mixture into a 9-inch pan. Press it into the pan and up the sides. Pack it tight, so it won’t fall apart while cutting the cheesecake to serve.
- Freeze for 10-20 minutes while preparing the cheesecake filling.
Cheesecake Filling
- In a large bowl, beat the room temperature cream cheese at medium speed with an electric mixer.
- Lower speed and add powdered sugar. As the powdered sugar begins to mix with the cream cheese, you can increase the speed to medium again. Lowering the speed is to prevent the powdered sugar from billowing up in your face and all over the kitchen.
- Mix in vanilla extract and lemon juice.
- Add cool whip.
- Mix until fluffy, smooth, and completely combined.
Assembly
- Remove the graham cracker crust from the freezer.
- Pour the cheesecake filling on top of the crust. Smooth into an even layer with a rubber spatula.
- Cover with plastic wrap and chill in the refrigerator for at least 4-6 hours. (I like to chill it overnight).
- Before serving, carefully spread the cherry pie filling on top of the cheesecake.
- Slice and serve!
If you tried this recipe, let me know how it came out in the comments below!
If you post a pic of it on social media, I’d love to see it! Please tag @lovemischka on Pinterest, FB, or Insta.

Leave a Reply